Wednesday 29 June 2011

FEEDING PLANTS


Plants require nutrients within the soil to develop into healthy plants. However, plants use these nutrients in large supply  whilst growing and so the soil fertility will decline over time. As a gardener you will have to improve the soil conditions from time to time in order to get the best from your plants and crops. 


The main three nutrient's that you can add to the soil are Nitrogen (N), Phosphorous (P) and Potassium (K).  Nitrogen is required for leaf development and formation of stems and branches, Phosphorus is required for root development and seed germination and Potassium is required for fruit and flower production and disease resistance.

Nutrients can be added into the soil either in the form of adding organic matter or by applying a fertiliser. Adding a organic matter to the soil helps to improve the soil structure and nutrients in order to support a vigorous, healthy crop. Adding fertiliser will not improve the soil but will provide the plants with sufficient nutrients to grow.


Organic matter
Organic matter can include manure such as well rotted farmyard manure, leaf mould or mushroom compost. Incorporating these into your soil improves soil structure and unlocks nutrients.

Fertiliser
Compound fertilisers contain Nitrogen, Phosphorus and Potassium (NPK).  The quantity of each nutrient can vary and is stated in the NPK ratio on the package. Fertilisers can come in liquid, granular or powder form which can be applied with appropriate applicator.

Prior to planting or sowing a base dressing of fertiliser such as Growmore can be beneficial.  A top dressing is required for crops that take some time to mature and should be applied during the growing season. A liquid fertiliser diluted in water and applied by watering can or hose-end dilutor can be very effective. Alternatively, a slow release fertiliser can release nutrients into the soil for up to 6 months.

For related articles click onto:
Aphids
Drainage
Feeding plants
Grass maintenance - laying turf
Grass maintenance - sowing a lawn from seed

Green manure: Broad beans
Herbaceous borders
How to build a cold frame
History of the lawn
How to make compost
How to propagate from seed
Lawn care
Laying concrete
Manuring

Watering plants
Weeding

What is a potager?
Preparing a seed bed
Potagers
Rose pest and diseases
Soil structure
Tree size

Monday 27 June 2011

DO WORMS SLEEP?


Have you ever seen a worm having a nap? Its difficult to observe if worms sleep due to them inconveniently living underground. I assume digging them up would wake them. And if they do sleep, what do they dream of? 

Worms are invertebrates with long, cylindrical bodies that have no limbs. They move around by moving bristles on their body. Having no true vertebrate brain, their functions are controlled by nerve centres called the ganglia. They have no eyes, relying on photo receptive cells to distinguish light instead.  Worms are hermaphrodites, having both male and female sexual organs, but can cross fertilise.

Worms can eat and digest between half and all of their body weight in a single day, converting waste into nutrient-rich worm casts. They need to retain moisture and do this by secreting mucus.  Moving through the soil in chambers, worms travel up to the surface to mate and feed. They are constantly active during a 24 period, although they are more active from dawn to dusk.

Worms are generally considered by scientists not to sleep.  They may enter a dormant state during periods of drought or heat when soil conditions change, and this is known as Dispause.  During this dormant period they make a chamber into which they curl up into a mucus covered ball. Because all other behaviours cease, this dormant period is the closest a worm gets to sleeping.

For related articles click onto:  
Can starfish grow back their arms?
Earthworms
How big is a giant earthworm?
Is the sea sponge a plant or an animal?
Ladybirds
Ladybird facts
Keystone species
Moth Facts
Sea animals: Sea Anemones
Sea cucumber facts
Seahorse facts
Star Starfish
The false widow spider
The seahorse
The sea cucumber
What is a sea sponge?
What is a cuttlefish?
What is a ladybug?
What is a sea anemone?
What is a starfish?
What is the difference between a millipede and a centipede?
What is the difference between an insect and a spider?
What is the difference between a butterfly and  a moth?
What is the difference between a wasp and a hornet?
Worm facts

Sunday 26 June 2011

LAYING CONCRETE


High use areas in your garden may require a hard surface. Concrete is a very hard wearing and versatile material and can be used successfully for driveways or paths.  Concrete can bedecorated with tiles, stonework, inlaid bamboo, coloured or painted to provide a decorative effect.

The depth of concrete that you require depends on the use of the area.  Pedestrian areas require a depth of 7.5 cm concrete laid over a depth of  7.5 cm scalpings.  Areas that take light traffic such as driveways require twice this depth; 15 cm concrete over 10 cm of scalpings. 

When laying concrete it should be contained within wooden frames.  Once you have marked out your area to be concreted then dig out soil to a depth to accommodate both your scalpings and concrete.  Ensure your path is level in order to allow rain water to run off the surface. You will need to allow a fall in gradient of 1:60.

Use timber that is 5 cm thick to create bays into which to pour the concrete. The depth of the timber should match the depth of concrete required.  Drive square wooden pegs into the ground and secure the wooden boards to the inside of the pegs to make a wooden frame.  Ensure your wooden panels are level by checking levels with a spirit level.

If you are concreting an area larger than 3-4 metres in length/width then you will need to divide the area into several frames to allow for expansion joints between each section. This will allow the concrete to expand within each section without cracking. Suitable expansion joints include treated fibre board which should be placed between each section. You may wish to mask these joints by the use of bricks, stone or bamboo on the top section of the joint.

Mix together 1 part concrete to 6 parts ballast to form the concrete mixture. Place the concrete into the place with shovels or wheel barrow, ensuring the concrete is slightly proud of the wooden edging boards.  Using a thick wooden board to tamper down the concrete in a downward motion to compact the concrete. 

Remove any excess concrete by moving the board in a sawing motion and level to the height of the edging boards. You may wish to decorate the surface of the concrete by in-laying stone or bamboo; or by watering the concrete lightly with a watering can to expose the stones within it.

You need to allow the concrete to set prior to use so when the surface is just firm enough to be covered without marking, lay over the surface with polythene sheets secured around the edge for approximately 3 days depending on weather conditions.  If desired, remove the wooden boarding.

For related articles click onto:
Garden sheds
Grass maintenance - laying turf
Grass maintenance - sowing a lawn from seed
History of the lawn

How to build a cold frame
How to make compost
Laying concrete
Manuring
Weeding
What is the difference between hard and soft woods?
Non-grass lawns
Paths - Brick paving
Preparing a seed bed
Potagers
Soil structure
Tree size

Thursday 23 June 2011

THINNING AND TRANSPLANTING


Thinning

However thinly you sow seeds you will inevitably find that they emerge from the soil too close together. You need to thin the seedlings in order to allow nearby seeds the space, water and nutrients to grow and develop into healthy plants.  Do not attempt to thin on only one occasion, you should repeat the operation several times.

Thinning should be carried out as soon as the seedlings are large enough to handle, usually when they have their second set of true leaves. Water the ground prior thinning in order to minimise damage to the roots. 

Select which seedling you want to remove, choosing the healthiest and best positioned seedlings.  Place your hand around the seedling, holding down the soil with your other hand, and gently lift the seedling.  If they are too close to lift without disturbance then you may wish to remove the top growth of unwanted seedlings. After lifting, firm the soil around the seedlings and water gently.


Transplanting

You may wish to move seedlings to their permanent location when they have germinated. They may be seedlings you have grown in pots, trays or in a seed bed. Not all plants are suitable to be transplanted, and sometimes thinning is more appropriate.

Brassicas, beans and peas transplant well, whilst root crops do not and should be avoided. Transplanting seedlings can be very stressful for the plant. In order to successfully transplant seedlings ensure that the risk of frost has passed and water after planting if conditions are dry. 

Select a suitable area to transplant your seedlings too and ensure the soil is cultivated to a fine tilth, adding manure where necessary. Water the seedlings and transplant site well the day prior to transplanting. Gently remove your seedlings with a trowel and place the seedlings into the new area at the same depth as the pot or bed from which they were removed. After transplanting, firm the soil and water gently.

For related articles click onto:
Feeding plants
Grass maintenance - laying turf
Grass maintenance - sowing a lawn from seed
How to build a cold frame
How to make compost
How to propagate from root cuttings
Laying concrete
Manuring
Weeding
Preparing a seed bed
Plants for Autumn
Potagers
The anatomy of vegetables

Tuesday 21 June 2011

RECIPE FOR VICTORIA SPONGE CAKE


This cake is ideal for birthdays, Sunday tea or just to impress the parents with some good old fashioned home cooking.  Its simple to make and tastes divine.  

I have made it many times and its always turned out well.  You can add 3 tablespoons of chocolate powder to the mixture too for a chocolate version, or perhaps some coffee powder.  I often make butter icing for the filling and top, which is made from 2 parts icing sugar (8 oz) to 1 part butter (4oz).

Ingredients
200 g/7 oz caster sugar
200 g/7 oz self raising flour
1 tea spoon baking powder
4 medium eggs
200 g/7 oz margarine
Vanilla essence
2 tablespoons milk

For the filling:
140 g/ 5 oz Icing sugar
100 g/ 3.5 oz Butter
Vanilla essence
Strawberry Jam

Method
Heat the oven to 190 degrees/gas mark 5.  Grease two cake tins and line with baking paper.

Place the margarine and sugar into a bowl and cream together until smooth.  Add the eggs, flour, baking powder, milk and vanilla essence and mix thoroughly. Divide the mixture evenly into the cake tins and place in the oven for 20 minutes. Cook until the cake springs back when lightly pressed.  Allow to cool on a wire rack.

To prepare the filling, cream together the butter and icing sugar adding 5 drops of vanilla essence.  Spread this butter icing onto the underside of one of the sponges and jam onto the top of the other sponge and sandwich together. Decorate by dusting with icing sugar.

For related articles click onto:
Banana loaf recipes
Black Forest cake
Birthday cake recipe
Carrot cake recipe
Cherry pie
Christmas cake
Christmas mince pies
Christmas puddings

Coffee and walnut cake
Gooseberry crumble
Lemon meringue pie
Loaf cakes
Recipe for apple crumble
Recipe for blackcurrant cheesecake
Recipe for cherry pie
Recipe for Chocolate Cheesecake
Recipe for Egg Custard
Recipe for English Apple pie
Recipe for fairy cakes
Recipe for home made olive bread
Recipe for pancakes
Recipe for rhubarb crumble
Recipe for scones
Recipe for shortbread
Recipe for strawberry cheesecake
Recipe for strawberry jam
Sponge cake recipe
Strudel recipe

Monday 20 June 2011

RECIPE FOR STRAWBERRY CHEESECAKE


This rich and creamy cheesecake is ideal for all your cheese lovers out there.  It is one of my favourites.

Ingredients
15 digestive biscuits
50 g butter
250g mascarpone cheese
200g cream cheese
100 ml double cream
3 oz caster sugar
Strawberries to decorate


Method
Crush the digestive biscuits to form fine crumbs. Melt the butter and add to the biscuit crumbs.  Place the mixture into a cake tin and push down firmly with the back of a spoon.  Place in the fridge to chill for 30 minutes.


Place the mascarpone cheese, cream cheese and sugar into a bowl and mix thoroughly with a wooden spoon.  Place the double cream into a bowl and whip until it thickens then mix the cream into the cheesecake mix.


Pour the cheesecake mix onto the base and place in fridge for at least 4 hours to set, ideally leave overnight.

Decorate with sliced strawberries and icing sugar.  Serve with double cream.


For related articles click onto:
Banana loaf recipes
Black Forest cake
Carrot cake recipe
Cherry pie
Christmas cake
Christmas mince pies
Christmas puddings

Coffee and walnut cake
Lemon meringue pie
Loaf cakes
Recipe for apple crumble
Recipe for Asparagus Quiche
Recipe for blackcurrant cheesecake
Recipe for cherry pie
Recipe for Chocolate Cheesecake
Recipe for Egg Custard
Recipe for English Apple pie
Recipe for pancakes
Recipe for pea salad with mint

Recipe for pickled cucumber
Recipe for Plum Chutney
Recipe for spinach and broccoli fritatta
Recipe for strawberry cheese cake
Recipe for strawberry jam
Recipe for tomato soup
Recipe for victoria sponge
Strudel recipe
Sponge cake recipe
Sultana Scones

Friday 17 June 2011

POTAGERS


The French named their kitchen gardens potagers and today this term is used to describe a decorative garden where fruit, vegetables and herbs are grown in a plot in a ornamental fashion.

A potager is a French term for an ornamental vegetable or kitchen garden. The French named their kitchen gardens 'Jardin Potager'. The historical design precedent originated from the Gardens of the French Renaissance and Baroque eras.  T

The arrangement of the crops is just as important as the production of food. These herbs and vegetables are often interpolated with flowering plants and shrubs, but the main features are the vegetables. Non-food plants play a supporting role in the potager but never take centre stage.

The Potager is more than a vegetable plot.  It is a formal, decorative garden that places vegetables at the top of the bill, whether they are suitable as crops or just for orientation. The beauty in the garden is the celebration of the vegetables, herbs and fruit on their own merit.

Potagers are formal in design, often conforming to geometric patterns and beds are typically enclosed by dwarf hedging.  Often the paths are gravel or stone.  Arches often run across paths and are covered with runner beans, grapes and roses.


Plants are grown in groups for maximum effect.  Ornamental vegetables are grown as specimens amongst the beds.  Vegetables are set out in beds to contrast with each other with regards to form, texture and colour.  Swiss chard, with its white veins and stalks, or red varieties of celery and brussel sprouts make unusual plating combinations. The ferny leaves of the carrot, the red stalks of beetroot and yellow marjoram all contrast well.  This is an opportunity to showcase vegetables in a formal garden style to dazzling effect.

For related articles click onto:
Aphids
Can you keep bees in your garden?
Differences between vegetables and fruit
Drainage
Feeding plants
Growing herbs
Herbaceous borders
How do I attract bees into my garden?
How to build a cold frame
How to grow seeds indoors
How to propagate using division
How to propagate from seed
Patio gardens
Plants for free
Preparing a seed bed
Shade loving fruit and nuts
Soil structure
What is a loofah?
What is a potager?
What is a vegetable?
What is the difference between a vegetable and a fruit?

Wednesday 15 June 2011

PREPARING A SEED BED


Most vegetables can be sown directly into the soil.  You may wish to give some plants a head start by sowing them indoors in the spring, and this can be especially helpful for half hardy vegetables such as tomatoes. 


Some vegetables such as artichoke, asparagus and rhubarb are grown by planting rooted material rather than by seed. When planting seeds directly outside you will need to prepare a suitable planting area for them, known as a seed bed.

Soil Structure
You need to ensure that the seed bed consist of crumbly soil, which will enable your seedlings to easily set out roots and establish.  This needs to be started in the autumn, when you need to select a suitable location for your seed bed. Dig over the bed to a spades depth.  Preparing the bed now means that the winter frosts will break up the clods and do the work for you.


In the following year dig over the bed when the soil is workable and moisture is held below the top crust of soil, usually early spring.  Do not attempt this if the soil is still very wet and is muddy. Break down the clods of earth using a garden fork or rotovator depending on the size of your bed. You are aiming to break up large clods of earth and roughly level the surface.  Only dig down to a spades depth.  You will need to repeat this operation across the bed at right angles to ensure that you have loosened up all the soil.


Nutrition
You will need to ensure that your seedlings have adequate nutrients in the soil to develop healthy shoots and roots, so you will need to add a fertiliser to the soil.  Apply a general fertiliser to the surface of the bed at the manufacturers recommended rates immediately following the preparation of the soil and incorporate it into the top 5cm of the soil. Do not leave fertiliser on the surface of the bed as it can cause damage to the roots of your seedlings if left in concentrated form.


Preparation
Rake over the surface of the bed to fill any hollows and break up mounds.  Minimise treading across the bed as this will damage the soil structure. Remove any stones or debris.  Finally use the rake in a push-pull technique to level the soil to produce a smooth and crumbly surface.  You are aiming for the crumb structure to have consistency of coarse breadcrumbs.


Planting
You can plant direct into the soil. The larger the seed, the larger the tilth can be.  Small seeds will require a fine tilth. If weather is dry ensure you water the bed prior to planting or the soil will be too fine and dusty.  Plant the seeds in drills made using either a trowel or a bamboo stick depending on variety you are planting.  Cover with soil, label and water lightly.  You may wish to protect your seedlings from disturbance by erecting cloches or hanging old CDs nearby. 


When seedlings have emerged you may wish to thin seedlings or may want to transplant seeedlings to another location to mature in-situ.


Monday 13 June 2011

NON-GRASS LAWNS


Lawns are popular because they provide green cover that is hard wearing, ascetically pleasing and suitable for both  walking over and playing on. There are many different species of grass seed and each has its own characteristics that can suit most garden conditions.  But if you don’t want a grass lawn but still want to use plants, what are the alternatives?

Grass is low growing and has lateral shoots which makes the sward thick.  Because the root zone can produce grass shoots at such a low height, it can be mowed frequently without detrimental effect.  Cricket wickets successfully rely on the root zone of the grass to hold the soil together because the grass blade is mown so short.

Plants that mimic this low growing, prostrate habit work well as alternatives to grass.  They include herbs such as chamomile, pearlwort and thyme; groundcover plants and some plants traditionally considered lawn weeds.

The advantage of using alternatives to grass is that they can grow in areas that would be difficult to mow. However, often these plants are not as hard wearing as grass and so not suitable for playing sports on or high use areas.

Herbs
Camomile lawns were popular in the formal gardens of the fifteenth and sixteenth centuries, and have rosettes of fine, scented leaves which are tolerant of some walking or sitting on. Use the non flowering variety, Anthemis nobile 'Treneague'.  As they are non-flowering, the lawn will have to be planted from rosettes.


Thyme lawn
Thyme lawns make fine leaved green mats but are not tolerant of pedestrian traffic so are best admired from afar.  Varieties used include creeping thymes such as Thymus drucei and Thymus serphyllum. They provide a scent and flower in summer. There are many different varieties that can be interwoven across your lawn to stunning effect.


Creeping mint, Mentha requienii, is good for shady areas.


Ground cover planting
The advantage of using ground cover plants is that they can be planted on steep banks or areas inaccessible to mowers.  Ajuga reptans, Vinca minor, Pachysandra terminalis or hedra helix are all low growing ground cover plants that will provide excellent cover in shady areas.  Achillea tomentosa and Acaena microphylla are great for sunny areas.


Lawn weeds
Moss can provide excellent ground cover and thrives in shady and damp areas. Keep weed free and water in dry spells.


Clover lawn
Clover was once considered a lawn weed but can be suitable to provide a green carpet.  It tolerates poor soil and has nitrogen fixing properties that improves the soil quality. Having long roots it is more drought tolerant that some other lawn plants and so retains its green appearance during dry weather.

Sagina pilifera, pearlwort, provides  a spongy carpet with white flowers. It should be planted in well drained soil in partial shade. Better suited to small areas of lawn.

For related articles click onto:
Drainage
Feeding plants
Grass maintenance - laying turf
Grass maintenance - sowing a lawn from seed
How to build a cold frame
How to make compost 

Lawn care
Soil structure
Manuring
Weeding
What is the difference between a rhododendron and an azalea?
Non-grass lawns
Paths - Brick paving
Preparing a seed bed
Potagers

Lawn care
Laying concrete
Using pedestrian mowers

Saturday 11 June 2011

RECIPE FOR CHERRY PIE


Nothing can beat the smell of home made cherry pie.  This recipe is best made using fresh cherries that are in season from July onwards.

Ingredients

Pie filling
1 lb fresh cherries
4 oz black cherry jam
2 tsp arrowroot
75 ml water

Pie
Short crust pastry (either pre-rolled or made from 10 oz/250g  plain flour, 50 oz/140 g butter, 3 tablespoon water, 1 egg and a pinch salt).

1 egg, beaten
2 tablespoons caster sugar


Method
Remove the stones and stalks from the cherries. Heat the jam and water in a pan gently until the jam bubbles, Add the arrowroot and continue to stir until mixture thickens.  Add the cherries to the mixture and stir until they are covered.  Allow to cool.


Divide the pastry into two. Roll out the first piece of pastry and line a 10" pie dish. Transfer the cherry filling into the pie dish. Roll out the second piece of pastry and place over the top of the pie dish.  Press firmly around the edges to join the seam and trim, placing a hole in the centre of the pie to allow steam to escape.   Glaze with the egg and sprinkle with sugar.

Cook in an oven set to 200C/400F for 40 minutes or until the pie is golden brown.
Serve with vanilla ice-cream.

For related articles click onto:
Banana loaf recipes
Birthday cake recipe
Cherry pie
Christmas cake
Christmas mince pies
Christmas puddings

How to make pastry
Lemon meringue pie
Loaf cakes
Raspberry pie
Recipe for apple crumble
Recipe for Asparagus Quiche
Recipe for blackcurrant cheesecake
Recipe for cherry pie
Recipe for Chocolate Cheesecake
Recipe for Egg Custard
Recipe for English Apple pie
Recipe for fairy cakes
Recipe for Italian pizza
Recipe for Italian tomato sauce
Recipe for pancakes
Recipe for pea salad with mint

Recipe for pickled cucumber
Recipe for Plum Chutney
Recipe for rhubarb crumble
Recipe for Salmon with lemon and herbs
Recipe for scones
Recipe for shortbread
Recipe for strawberry cheesecake
Recipe for strawberry jam
Recipe for tomato soup
Recipe for victoria sponge
Strudel recipe

RECIPE FOR PICKLED CUCUMBERS


Cucumbers are in season from May onwards and taste their best then.  You can preserve your cucumbers by pickling and using as a garnish in your burgers or other dishes.

Ingredients
1 medium cucumber
6 table spoons White wine vinegar
2 table spoons Caster sugar
2 table spoons chopped Coriander leaves
2 table spoons chopped Dill
2 table spoons chopped Chili


Peel the cucumber, removing the seeds and thinly slice.  Place into a bowl and add the remaining ingredients.

Mix well, cover and place in a fridge for 1 hour or overnight.

For related articles click onto:

Artichokes Alla Romana
Chicken supreme
Chicken risotto recipe
Recipe for Asparagus Quiche
Recipe for Italian pizza
Recipe for Italian tomato sauce
Recipe for Quiche Lorraine
Recipe for pea salad with mint
Recipe for pickled cucumber
Recipe for Plum Chutney
Recipe for rhubarb crumble
Recipe for Salmon with lemon and herbs
Recipe Spaghetti bolognese
Recipe for spinach and broccoli fritatta

Recipe for tomato soup
Vegetarian recipes - vegetable fried rice

Tuesday 7 June 2011

HOW DO I ATTRACT BEES INTO MY GARDEN?


There are many beneficial insects that visit your garden, often feeding on pest species such as aphids, caterpillars and thrips. One of these beneficial insects are very important as they can help by pollinating your plants too. Say hello to the bee. 


If you take a close look around your garden you will notice many different varieties of bee; small black ones, green ones, striped and fuzzy ones. There are over 250 species of bee in Britain.  They are responsible tor pollinating a large number of fruits, flowers and vegetables. Bees play a very important role are a key part of our ecosystem.


By creating a habitat within your garden that is appealing to bees you will increase pollination and decrease pests. It is easy to attract bees into your garden if you have plenty of flowering plants. Bees feed on these plants looking for sugary nectar, which gives them energy; and pollen which provides them with proteins and fats.
They differ in the length of their tongue, and therefore there is a difference in the type of flower they visit for food. 

A range of flower shapes in your garden you will appeal to a wide variety of bees. Bumble beesBombus hortorum) have very long tongues and feed from plants with long corollas such as foxgloves and red campion. Some bees have learnt to access nectar from unsuitable plants such as Bombus terrestris, which pierce plants which have a long corolla and takes the nectar from the side of the flower.


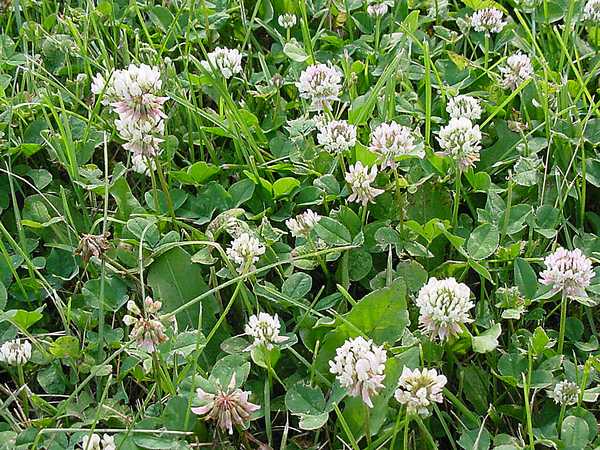
Planting a wide range of bee friendly plants in your garden that flower successively over a long period you will encourage more bees into your garden and support bees that fly at different times over the season. Some plants will be more appealing to bees than others. Native wild flowers provide the best source of pollen and nectar for our native bees, and are four times more attractive to bees than exotic plants.  These native plants are better adapted to our climate and growing conditions and need minimal attention.


Avoid plants that have been intensively bred as they contain little nectar or may be difficult for bees to access.  Bees have excellent colour vision to aid them to locate flowers and are particularly attracted to blue, purple, violet, white and yellow plants. Scented plants are also attractive to bees, such as herbs and evening scented plants.


Bees are more attracted to plants planted in groups, rather than individually. In addition to planting attractive plants, you can improve numbers of bees by not using pesticides in your garden as pesticide use can kill off beneficial bugs as well as pests.


The following plants are particularly appealing to bees:
Allium schoenoprasm (Chives)
Althaea rosea (Hollyhock)
Aquilegia (Columbine)
Aster (Aster)
Aubrieta deltoida (Aubrietia)
Berberis (Oregon grape) 
Borago officinalis (Borage)
Cotoneaster horizontalis (Cotoneaster)
Chrysothamnus (Rabbit-brush)
Ceanothus (Wild lilac)
Daphne mezereum (Daphne)
Digitalis (foxglove)
Echinops ritro (Globe thistle)
Echinacea (Purple cone flower)
Eriogonum (Wild buckwheat)
Foeniculum vulgare (Fennel)
Helianthus (Sunflower)
Hyssopus officinalis (Hyssop)
Knautia arvensis (Scabious)
Kallstroemia (Caltrop)
Larrea (Creosote bush) 
Lavendula spica (Lavender)
Lupinus (Lupin)
Melissa officinalis (Lemon balm)
Oenothera biennis (Evening primrose)
Origanum vulgare (Marjoram)
Papaver (Poppy)
Phacelia tanacetifolia (Californian bluebell)
Penstemon (Penstemon)
Reseda odorata (Common mignonette) 
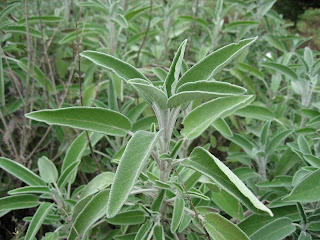
Rhododendron (Rhododendron)
Ribes (currant)
Rosmarinus officinalis (Rosemary)
Rudbeckia (Black eyed Susan)
Salvia officinalis (Sage)
Salix (willow)
Sambucus (Elder)
Sedum (Stonecrop)
Solidago (Goldenrod)
Symphytum grandiflorum (Comfrey)
Symphoricarpos (Snow Berry)
Thymus vulgaris (thyme)
Vaccinium (huckleberry)
Veronica spicata (Speedwell)
Wisteria (Wisteria)


For related articles click onto:
Ladybirds
Ladybird facts
Keystone species
Moth Facts
What is the difference between a butterfly and  a moth?
What is the difference between a wasp and a hornet?